

Posted by monica66 on 3/21/2018, 12:17 am
"Hi guys, I shot something with the .mts format via Canon. My understanding is that AVCHD is extremely compressed. Do I need to encode AVCHD to FCP friendly format so that I can edit AVCHD .mts videos in FCP?"
Simply put all you need to do is to convert the native footage from the Canon, Sony, Panasonic .etc from the AVC H.264 format to a format that your computer and software will support. For me its simple given that I work with Final Cut Studio Apples ProRes codec. What this means is that I simply convert the AVCHD footage to ProRes, the higher quality (and less compressed) codec with a professional third party program-Brorsoft MTS Converter for Mac.
With it, you can easily transcode AVCHD to Apple ProRes 422, ProRes 4444 for Final Cut Pro on Mac within few clicks. Besides Apple ProRes codec, it also offers optimized codecs for other NLEs such as MPEG-2 for Premiere, DNxHD for Avid, AIC for iMovie and more. If you are a PC user, pls turn to Brorsoft MTSConverter windows version. Now, download the software on computer and follow the guide below to start conversion.
How to Change AVCHD .mts to ProRes
Step 1: Download, install and launch the best MTS to ProRes Converter to import your .mts/.m2ts footages to it.
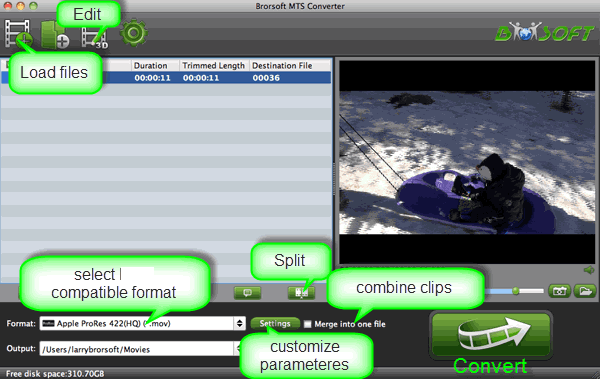
Step 2: Click format bar to choose "Apple ProRes" codec for AVCHD videos. You are provided with five Apple ProRes options listed as below. You can choose a proper one that fit your needs best according to the main difference of the five ProRes codecs. You're recommended to choose "Final Cut Pro -> Apple ProRes 422 (*.mov)", it's best for FCP editing.

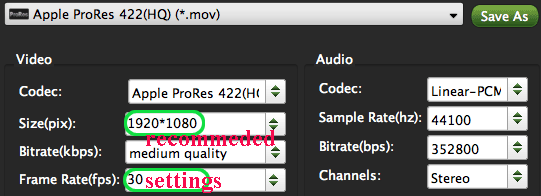
Step 3: You can click settings button in the main interface to adjust the output parameters, such as resolution, frame rate, etc, customize the parameters as you want.
Step 4: Hit "Convert" button to start transcoding AVCHD to Apple ProRes codec on Mac OS X. This conversion process will finish soon. Afterwards, click the "Open" button to locate the output files and import to FCP X/7/6.
In this way, you can easily import and edit your AVCHD video files in Final Cut Pro X/7/6 with ProRes codec smoothly.
Message Thread
![]()
« Back to index
